Rcloneというソフトウェアを使うと、DropboxやGoogleドライブ、OneDriveといった各種クラウドストレージを、コマンドラインから操作したり、ローカルドライブとしてマウントしたりすることが出来ます。インストール方法や使い方について、手順を残しておきます。
インストール
インストールは公式サイトにも書いてある通り、以下のコマンドにて行います。
下記はMac/Linuxの場合
# sudo -v ; curl https://rclone.org/install.sh | sudo bash
Linuxの場合はaptやyumコマンドでもインストールできます。
/* aptの場合 */
# apt-get install rclone

/* yumの場合 */
#yum install rclone
ちなみにWindowsの場合は、公式サイトからzipファイルをダウンロードしたら、中に.exeファイルがあるので、そちらをコマンドプロンプトで実行するだけのようです。
初期設定
以降はMac/Linuxの前提で進めていきます。
以下のコマンドで設定メニューを起動します。
設定メニュー表示
# rclone config
初期状態だと何も設定がないので、以下のメニューが表示されます。
No remotes found - make a new one
n) New remote
s) Set configuration password
q) Quit config
n/s/q> n
n と Enter を押して、新しい設定を入れていきます。
name> GDrive
今回は、Googleドライブの前提で進めていきますので、名前は仮に GDrive とします。任意で大丈夫です。
サービス選択
 1 / 1Fichier
   \ "fichier"
 2 / Alias for an existing remote
   \ "alias"
 3 / Amazon Drive
   \ "amazon cloud drive"
 4 / Amazon S3 Compliant Storage Provider (AWS, Alibaba, Ceph, Digital Ocean, Dreamhost, IBM COS, Minio, Tencent COS, etc)
   \ "s3"
 5 / Backblaze B2
   \ "b2"
 6 / Box
   \ "box"
 7 / Cache a remote
   \ "cache"
 8 / Citrix Sharefile
   \ "sharefile"
 9 / Dropbox
   \ "dropbox"
10 / Encrypt/Decrypt a remote
   \ "crypt"
11 / FTP Connection
   \ "ftp"
12 / Google Cloud Storage (this is not Google Drive)
   \ "google cloud storage"
13 / Google Drive
   \ "drive"
14 / Google Photos
   \ "google photos"
15 / Hubic
   \ "hubic"

〜〜中略〜〜

35 / seafile
   \ "seafile"
Storage>  13  ("drive" でも可)
長いので後半省略しますが、対応する全サービスが表示されます。今回はGoogle Driveなので 13 と入力します。””で囲われている文字でも指定できますので、driveと入れてもOKです。
クライアントID設定(省略)
Google Application Client Id
Setting your own is recommended.
See https://rclone.org/drive/#making-your-own-client-id for how to create your own.
If you leave this blank, it will use an internal key which is low performance.
Enter a string value. Press Enter for the default ("").
client_id>
クライアントIDの設定は任意なので、このままEnterで進みます。
秘密鍵設定(省略)
OAuth Client Secret
Leave blank normally.
Enter a string value. Press Enter for the default ("").
client_secret>
クライアントIDを設定しない場合は、こちらもそのままEnterで進みます。
Scope that rclone should use when requesting access from drive.
Enter a string value. Press Enter for the default ("").
Choose a number from below, or type in your own value
 1 / Full access all files, excluding Application Data Folder.
   \ "drive"
 2 / Read-only access to file metadata and file contents.
   \ "drive.readonly"
   / Access to files created by rclone only.
 3 | These are visible in the drive website.
   | File authorization is revoked when the user deauthorizes the app.
   \ "drive.file"
   / Allows read and write access to the Application Data folder.
 4 | This is not visible in the drive website.
   \ "drive.appfolder"
   / Allows read-only access to file metadata but
 5 | does not allow any access to read or download file content.
   \ "drive.metadata.readonly"
scope> 1
アクセス権の設定です。必要に応じて選択してください。今回は1のフルアクセスとします。
ルートフォルダID設定(省略)
ID of the root folder
Leave blank normally.

Fill in to access "Computers" folders (see docs), or for rclone to use
a non root folder as its starting point.

Enter a string value. Press Enter for the default ("").
root_folder_id>
ルートフォルダIDの設定です。こちらもデフォルトのままEnterで進みます。
サービスアカウント設定(省略)
Service Account Credentials JSON file path
Leave blank normally.
Needed only if you want use SA instead of interactive login.

Leading `~` will be expanded in the file name as will environment variables such as `${RCLONE_CONFIG_DIR}`.

Enter a string value. Press Enter for the default ("").
service_account_file>
サービスアカウント設定です。こちらもデフォルトのままEnterで進みます。
拡張設定(省略)
Edit advanced config? (y/n)
y) Yes
n) No (default)
y/n> n
拡張設定を行うか聞かれますが、行わないので n を入力します。
ブラウザ認証
Use web browser to automatically authenticate rclone with remote?
* Say Y if the machine running rclone has a web browser you can use
* Say N if running rclone on a (remote) machine without web browser access
If not sure try Y. If Y failed, try N.
y) Yes (default)
n) No
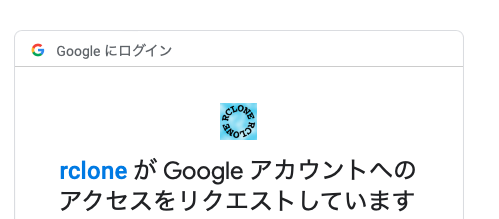
y/n> y
ブラウザで認証するか聞かれるので、y を入力します。するとブラウザが立ち上がりGoogle認証画面に行くので、設定するGoogleアカウントでログインして、↓の画面でrcloneのアクセスを許可します。
共有ドライブ設定(省略)
Configure this as a Shared Drive (Team Drive)?

y) Yes
n) No (default)
y/n> n
共有ドライブのバックアップをするか、という問いには n を入力します。
設定完了!
Configuration complete.
上記の通り表示されたら、設定完了です。
マウント方法
マウントする際のコマンドの一例を紹介します。
#cd マウントするフォルダがあるディレクトリに移動
#rclone --vfs-cache-mode writes mount --daemon GDrive: ./GDrive_Folder/

先程設定したGDrive を GDrive_Folder フォルダにマウントする
–daemon のオプションをつけることで、ターミナルを開きっぱなしにしておく必要がなくなります。
以上です。
著者について