CentOS + ApacheでサイトをSSLに対応させます。
Let’s Encrypt
無料のSSL証明書発行サービスであるLet’s Encryptを使用します。
インストール
まずは、インストールします。
# yum -y install epel-release
# yum -y install certbot python-certbot-apache

  /* それぞれ以下が表示されればOK */
# Complete!
証明書の発行
以下のコマンドで証明書を発行します。
# certbot certonly --webroot -w /var/www/html/ -d test.net
上記の /var/www/html/ は、ApacheのDocumentRootのパス、test.net はサイトのアドレスにそれぞれ置き換えます。
e-mailアドレスと、利用規約への同意を聞かれるのでそれぞれ入力&応答します。e-mailアドレスをシェアするかみたいな問いはYes,Noどちらでも。
Saving debug log to /var/log/letsencrypt/letsencrypt.log
Plugins selected: Authenticator webroot, Installer None
Enter email address (used for urgent renewal and security notices)
 (Enter 'c' to cancel): test@test.net
Starting new HTTPS connection (1): acme-v02.api.letsencrypt.org

- - - - - - - - - - - - - - - - - - - - - - - - - - - - - - - - - - - - - - - -
Please read the Terms of Service at
https://letsencrypt.org/documents/LE-SA-v1.2-November-15-2017.pdf. You must
agree in order to register with the ACME server. Do you agree?
- - - - - - - - - - - - - - - - - - - - - - - - - - - - - - - - - - - - - - - -
(Y)es/(N)o: Y

- - - - - - - - - - - - - - - - - - - - - - - - - - - - - - - - - - - - - - - -
Would you be willing, once your first certificate is successfully issued, to
share your email address with the Electronic Frontier Foundation, a founding
partner of the Let's Encrypt project and the non-profit organization that
develops Certbot? We'd like to send you email about our work encrypting the web,
EFF news, campaigns, and ways to support digital freedom.
- - - - - - - - - - - - - - - - - - - - - - - - - - - - - - - - - - - - - - - -
(Y)es/(N)o: N
Account registered.
Requesting a certificate for test.net
Performing the following challenges:
http-01 challenge for test.net
Using the webroot path /var/www/html for all unmatched domains.
Waiting for verification...
Cleaning up challenges

IMPORTANT NOTES:
 - Congratulations! Your certificate and chain have been saved at:
   /etc/letsencrypt/live/test.net/fullchain.pem
   Your key file has been saved at:
   /etc/letsencrypt/live/test.net/privkey.pem
   Your certificate will expire on 2021-10-15. To obtain a new or
   tweaked version of this certificate in the future, simply run
   certbot again. To non-interactively renew *all* of your
   certificates, run "certbot renew"
 - If you like Certbot, please consider supporting our work by:

   Donating to ISRG / Let's Encrypt:   https://letsencrypt.org/donate
   Donating to EFF:                    https://eff.org/donate-le
Cleaning up challenges の表示が出ればOK。
証明書作成が完了すると、以下のパスに作成されます。
# find /etc/letsencrypt/live/test.net/
/etc/letsencrypt/live/test.net/
/etc/letsencrypt/live/test.net/cert.pem
/etc/letsencrypt/live/test.net/privkey.pem
/etc/letsencrypt/live/test.net/chain.pem
/etc/letsencrypt/live/test.net/fullchain.pem
/etc/letsencrypt/live/test.net/README
ApacheのSSL設定
Apacheの設定ファイル /etc/httpd/conf.d/ssl.conf を以下の通り修正します。元々ある行をコメントアウトか削除し、作成した証明書のパスに書き換えます。
# vi /etc/httpd/conf.d/ssl.conf

#   Server Certificate:
# Point SSLCertificateFile at a PEM encoded certificate.  If
# the certificate is encrypted, then you will be prompted for a
# pass phrase.  Note that a kill -HUP will prompt again.  A new
# certificate can be generated using the genkey(1) command.
# SSLCertificateFile /etc/pki/tls/certs/localhost.crt
SSLCertificateFile /etc/letsencrypt/live/test.net/cert.pem

#   Server Private Key:
#   If the key is not combined with the certificate, use this
#   directive to point at the key file.  Keep in mind that if
#   you've both a RSA and a DSA private key you can configure
#   both in parallel (to also allow the use of DSA ciphers, etc.)
# SSLCertificateKeyFile /etc/pki/tls/private/localhost.key
SSLCertificateKeyFile /etc/letsencrypt/live/test.net/privkey.pem

#   Server Certificate Chain:
#   Point SSLCertificateChainFile at a file containing the
#   concatenation of PEM encoded CA certificates which form the
#   certificate chain for the server certificate. Alternatively
#   the referenced file can be the same as SSLCertificateFile
#   when the CA certificates are directly appended to the server
#   certificate for convinience.
#SSLCertificateChainFile /etc/pki/tls/certs/server-chain.crt
SSLCertificateChainFile /etc/letsencrypt/live/test.net/chain.pem

:wq!
ファイルを修正したら、Apacheのプロセスを再起動します。
# systemctl restart httpd
ファイアウォール設定(Lightsail)
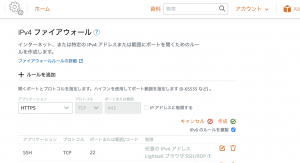
インスタンスの管理画面から、ネットワーキング → IPv4ファイアウォール の項目へと進み、ルールを追加 を選択し、アプリケーションでhttpsを選択したら作成を押します。

アクセス確認
ここまでくればアクセスできるようになりますので、アドレスをhttps://〜にしてアクセスしてみます。
https://Lightsailのアドレス/
以上
著者について